harness9 工具调用系统 — 从接口契约到并发沙箱的工程实践
关于 harness9
harness9 是一款轻量、完备、生产可用的 Go 语言 Agent Harness 框架。
Star 是对开源工作最直接的支持,欢迎提 Issue 和 PR。
TL;DR
harness9 的工具调用(Tool Calling)系统围绕三个核心决策展开:接口在使用者侧定义、并发执行保序写入、错误原样回传触发自愈。路径沙箱与路径级读写锁是生产可用的安全底线,edit_file 的四级模糊匹配是对 LLM 输出不稳定性的系统性对抗。
一、数据类型层:三个类型撑起整个协议
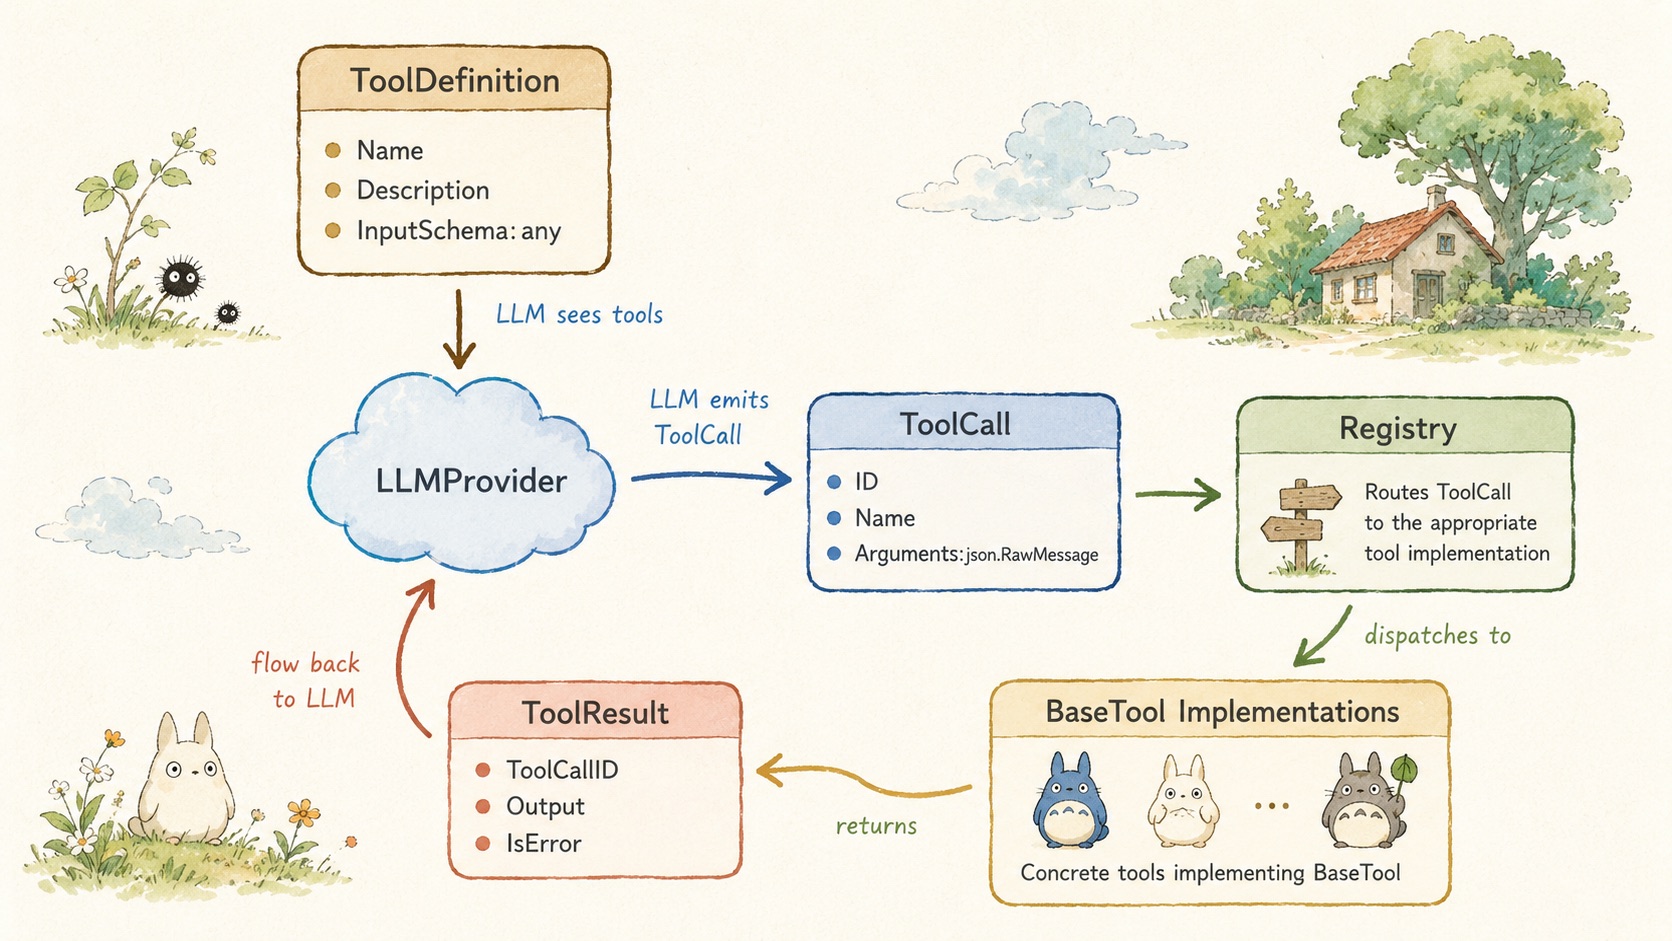
工具调用系统的契约从 internal/schema/message.go 中三个类型出发。
type ToolCall struct {
    ID        string
    Name      string
    Arguments json.RawMessage // 延迟反序列化,解析责任在具体工具
}

type ToolResult struct {
    ToolCallID string
    Output     string
    IsError    bool  // true 时引擎将错误原文回传给 LLM
}

type ToolDefinition struct {
    Name        string
    Description string
    InputSchema any   // 各 Provider 自行适配 SDK 类型
}
Arguments 使用 json.RawMessage 是一个蓄意的设计选择。引擎层不知道、也不需要知道每个工具的参数结构。类型安全边界被推迟到工具实现内部,代价是每个工具都要自行调用 json.Unmarshal,收益是引擎与工具完全解耦——新增工具不需要改引擎任何一行代码。
InputSchema 使用 any 同理。内置工具以 map[string]interface{} 形式声明 JSON Schema,各 Provider 适配器再把它转换为自家 SDK 要求的类型(OpenAI 的 shared.FunctionParameters、Anthropic 的 map[string]any),schema 包本身不感知厂商差异。
二、接口层:定义在使用者侧
harness9 的接口设计遵循 Go 惯例:接口声明在依赖方,而非实现方。
BaseTool 接口定义在 internal/tools/base.go,Registry 接口也在同一个包:
type BaseTool interface {
    Name() string
    Definition() schema.ToolDefinition
    Execute(ctx context.Context, args json.RawMessage) (string, error)
}

type Registry interface {
    Register(tool BaseTool) error
    GetAvailableTools() []schema.ToolDefinition
    Execute(ctx context.Context, call schema.ToolCall) schema.ToolResult
}引擎包(internal/engine)依赖 tools.Registry 接口,而非 registryImpl 具体类型。这意味着测试时可以注入任意 mock,生产代码不需要任何改动。
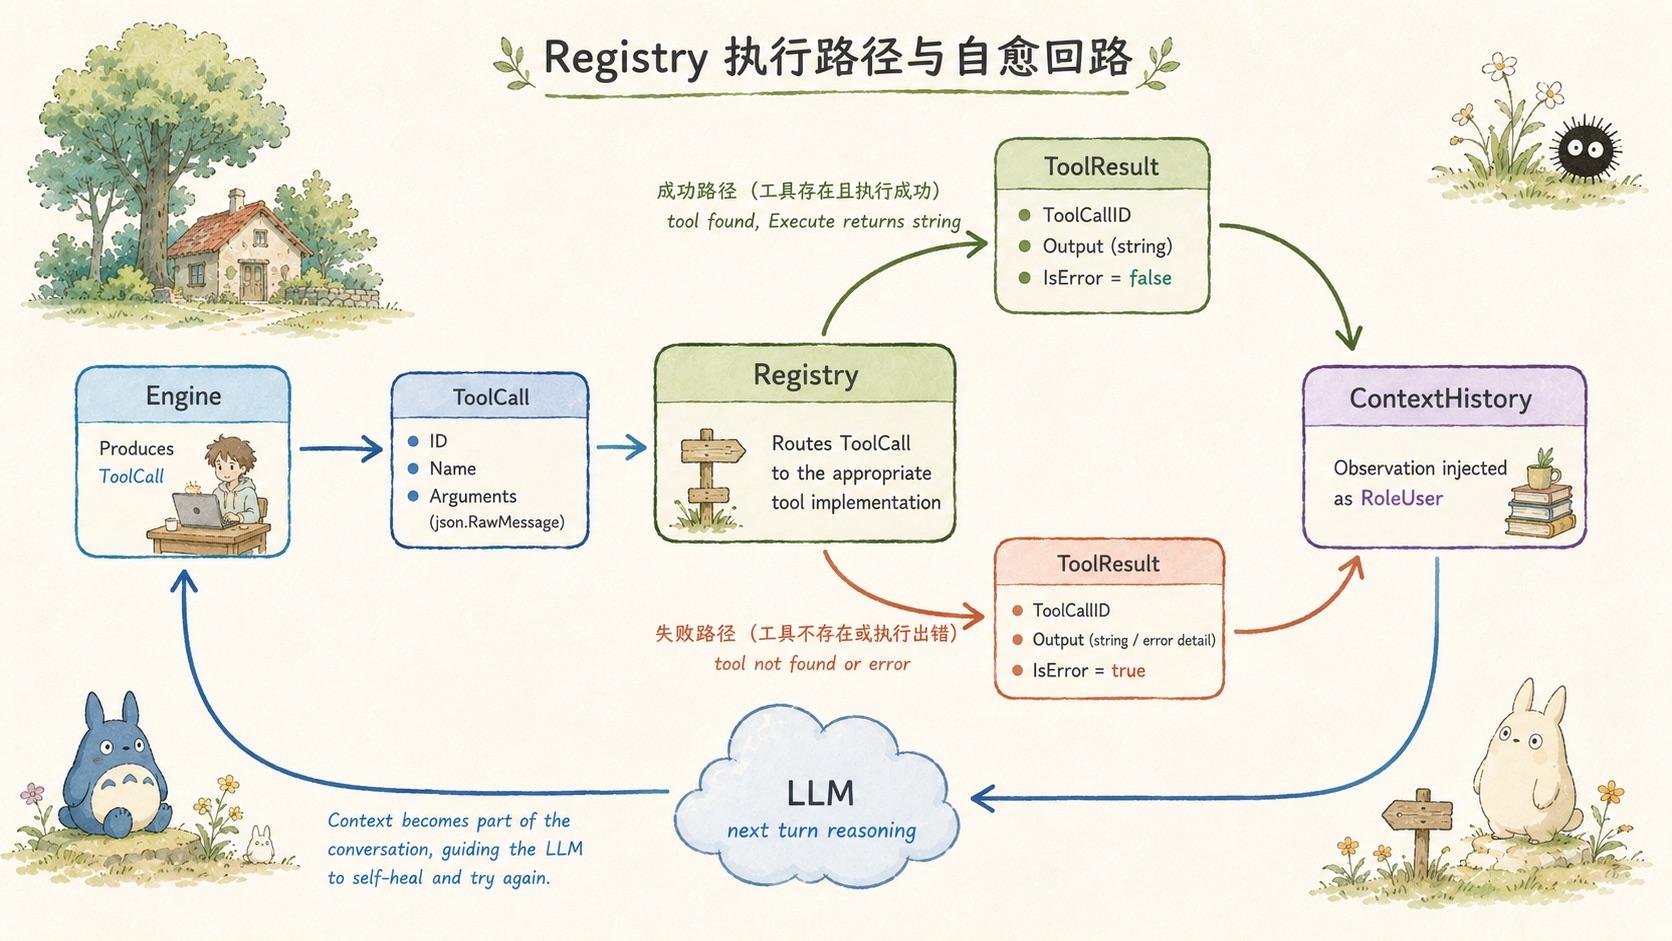
Registry.Execute 的签名值得注意——它接收 schema.ToolCall,返回 schema.ToolResult,而不是 (string, error)。这个封装在注册表层完成了一次关键的语义转换:工具执行失败不再是 Go 层面的 error,而是 IsError=true 的 ToolResult。引擎可以把这条失败记录作为普通 Observation 注入上下文,LLM 在下一轮推理时看到错误信息,自行决定如何处理。
func (r *registryImpl) Execute(ctx context.Context, call schema.ToolCall) schema.ToolResult {
    tool, exists := r.tools[call.Name]
    if !exists {
        return schema.ToolResult{
            ToolCallID: call.ID,
            Output:     fmt.Sprintf("Error: 系统中不存在名为 '%s' 的工具。", call.Name),
            IsError:    true,
        }
    }
    output, err := tool.Execute(ctx, call.Arguments)
    if err != nil {
        return schema.ToolResult{
            ToolCallID: call.ID,
            Output:     fmt.Sprintf("Error executing %s: %v", call.Name, err),
            IsError:    true,
        }
    }
    return schema.ToolResult{ToolCallID: call.ID, Output: output}
}
错误不终止循环,错误是下一轮推理的原材料——这是 harness9 自愈(Self-Healing)能力的物质基础。
三、并发执行模型:预分配切片 + 索引写入
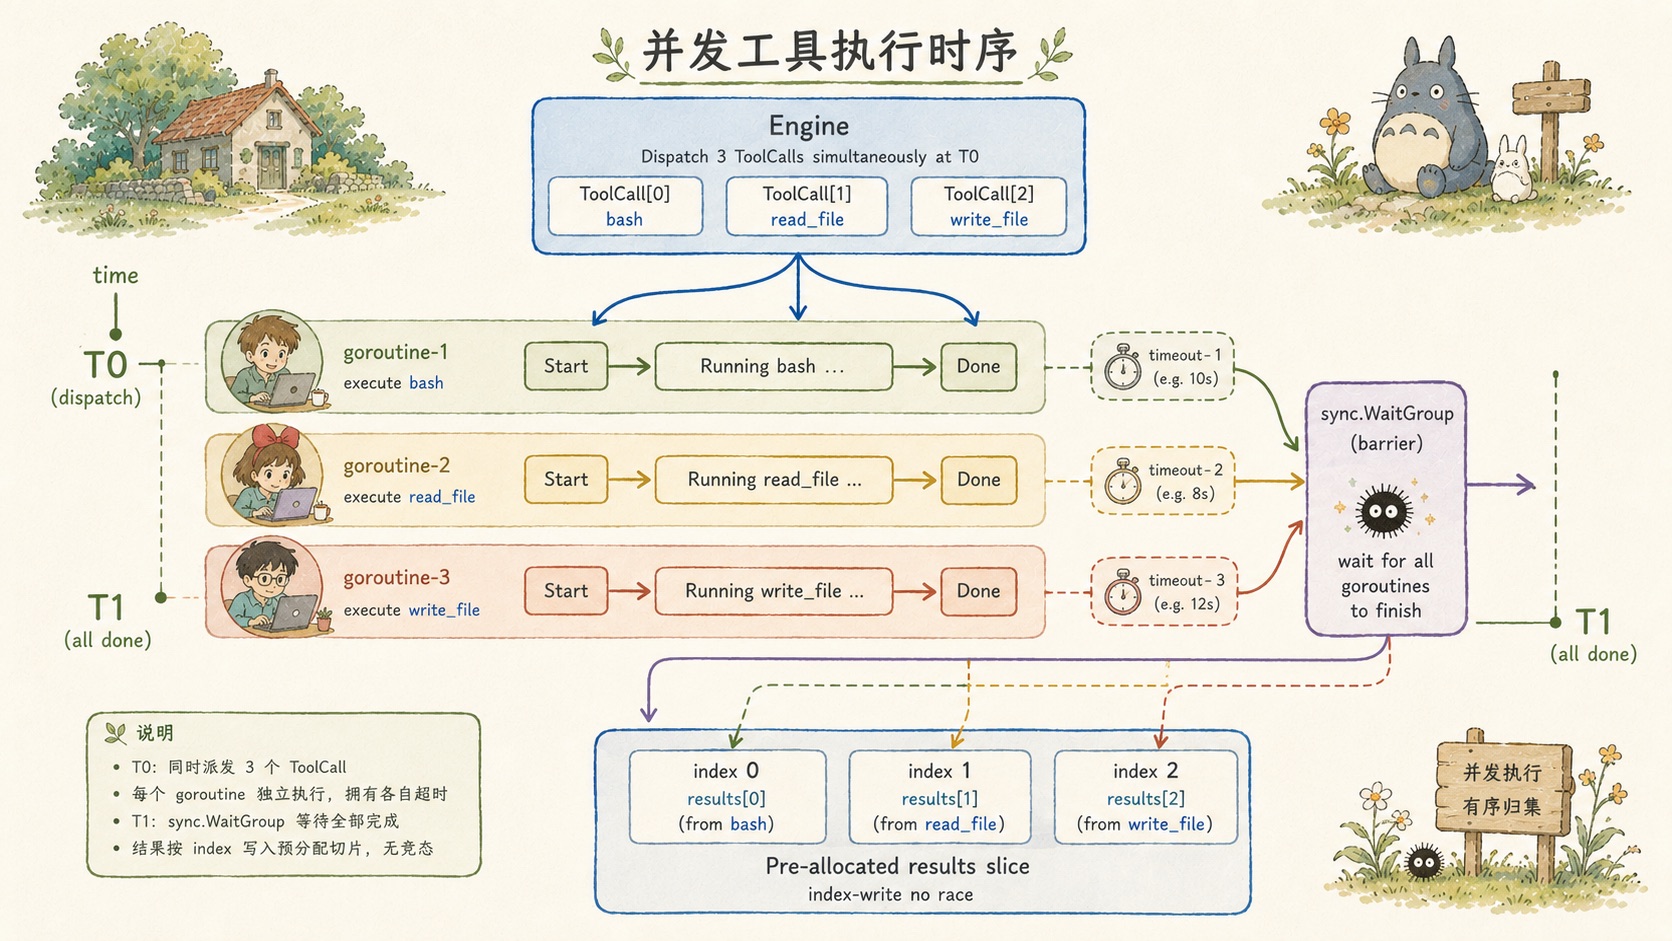
主流 LLM(GPT、Claude)可以在单次响应中发出多个 ToolCall。harness9 在引擎层并发执行它们:
func (e *AgentEngine) executeTools(ctx context.Context, turn int,
    toolCalls []schema.ToolCall, logPrefix string, em emitter) []schema.ToolResult {

    results := make([]schema.ToolResult, len(toolCalls)) // 预分配
    var wg sync.WaitGroup

    var sem chan struct{}
    if e.maxConcurrentTools > 0 {
        sem = make(chan struct{}, e.maxConcurrentTools) // 并发度限制
    }

    for i, toolCall := range toolCalls {
        wg.Add(1)
        go func(idx int, tc schema.ToolCall) {
            defer wg.Done()
            if sem != nil {
                sem <- struct{}{}
                defer func() { <-sem }()
            }
            toolCtx := ctx
            var cancel context.CancelFunc
            if e.toolTimeout > 0 {
                toolCtx, cancel = context.WithTimeout(ctx, e.toolTimeout)
                defer cancel()
            }
            // ...
            results[idx] = e.registry.Execute(toolCtx, tc) // 索引写入
        }(i, toolCall)
    }
    wg.Wait()
    return results
}
两个并发安全细节值得单独拎出来说:
预分配 + 索引写入:results 在启动 goroutine 之前就已分配好长度,每个 goroutine 通过闭包捕获的 idx 写入固定位置,不同 goroutine 写不同槽位,无竞态条件,也不需要任何锁。Go 的内存模型保证这种模式是安全的。
每工具独立超时:每个 goroutine 内部通过 context.WithTimeout(ctx, e.toolTimeout) 创建子上下文。一个工具超时只会取消自己的子上下文,不会影响同 Turn 内其他工具的执行。这是 toolCtx 而非共享 ctx 传给 registry.Execute 的原因。
并发度通过 maxConcurrentTools 选项控制——信道作信号量,sem <- struct{}{} 阻塞表示占位,<-sem 释放槽位。设为 0 时不限制并发度。
引擎的默认配置是 maxTurns=50, toolTimeout=60s,为生产场景提供合理的上限兜底。
四、路径沙箱:safePath 的两层防线
bash 工具不做命令限制,read_file 和 write_file 则受到 safePath 保护。两者的安全哲学截然不同,但都是刻意的选择。
safePath 的核心逻辑在 internal/tools/safe_path.go:
func safePath(workDir, inputPath string) (string, error) {
// 绝对路径输入先检:在 Join 前直接拦截敏感路径
if filepath.IsAbs(inputPath) {
cleanInput := filepath.Clean(inputPath)
if isSensitivePath(cleanInput) {
return "", fmt.Errorf("路径 '%s' 是受保护的敏感路径,禁止访问", inputPath)
}
}
cleanWorkDir := filepath.Clean(workDir)
joined := filepath.Join(cleanWorkDir, inputPath)
absPath, err := filepath.Abs(joined)
// ...
// 前缀必须是 cleanWorkDir + PathSeparator,不能只是 cleanWorkDir
// 否则 "/project-evil" 会被误判为 "/project" 的合法子路径
if !strings.HasPrefix(absPath, cleanWorkDir+string(os.PathSeparator)) && absPath != cleanWorkDir {
return "", fmt.Errorf("路径 '%s' 超出工作区范围", inputPath)
}
if isSensitivePath(absPath) { // 二次检查:Join 后再过一遍
return "", fmt.Errorf("路径 '%s' 是受保护的敏感路径,禁止访问", inputPath)
}
return absPath, nil
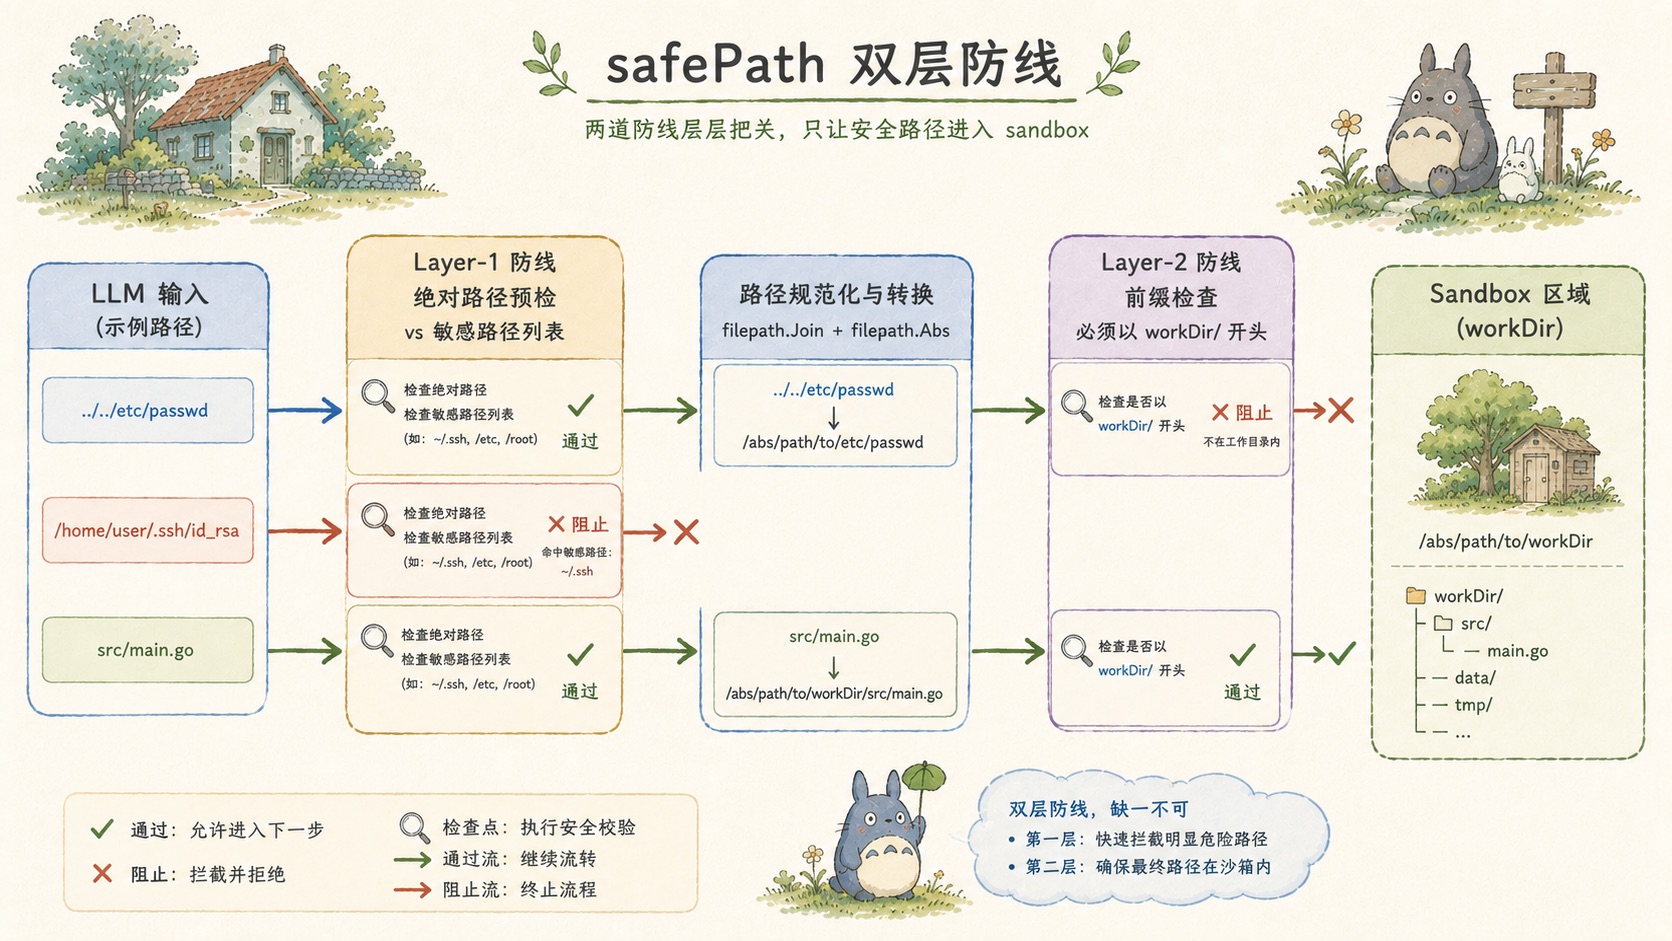
}两层防线各有针对的攻击向量:
第一层(绝对路径预检)针对直接提供绝对路径的情形,在 filepath.Join 前就拦截,防止攻击者通过 /home/user/.ssh/id_rsa 绕过相对路径沙箱。
第二层(Join 后前缀校验)针对 ../../etc/passwd 这类相对路径穿越。filepath.Abs 会把 Join("/project", "../../etc/passwd") 解析成 /etc/passwd,然后前缀校验发现它不以 /project/ 开头,直接拒绝。
注释里那个 /project-evil 细节是真实 bug 的防范——纯字符串前缀匹配时 /project-evil 会通过 /project 的检查,但加上 PathSeparator 就不会了。
硬编码的敏感路径列表包含 ~/.ssh、~/.aws、~/.kube、~/.gnupg、~/.netrc、~/.config/gcloud——这些是凭证泄漏风险最高的目录,无论 workDir 设置成什么都会被拒绝。
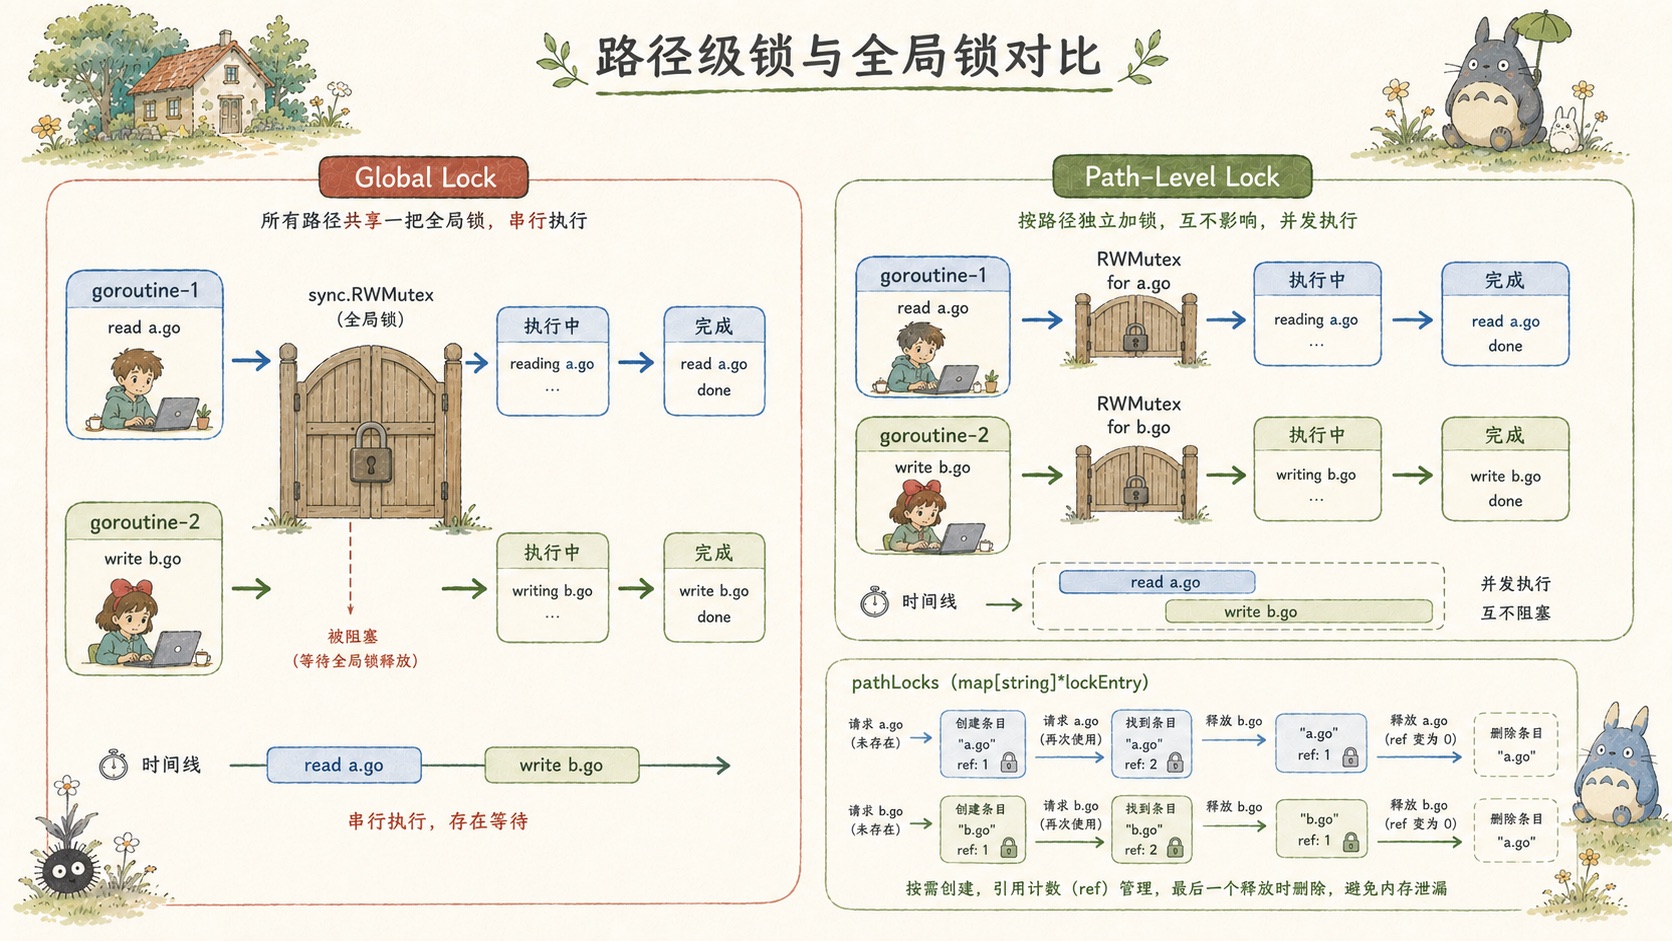
五、路径级锁:比全局锁细一个量级
safePath 防的是越界,路径级读写锁防的是同一文件上的并发竞争。
internal/tools/path_locker.go 实现了一套引用计数的路径粒度锁:
type pathLock struct {
    rw  *sync.RWMutex
    ref int
}

var (
    pathLocksMu sync.Mutex
    pathLocks   = make(map[string]*pathLock)
)

func RLockPath(path string) func() {
    l := getOrCreatePathLock(path) // ref++
    l.rw.RLock()
    return func() {
        l.rw.RUnlock()
        releasePathLock(path, l) // ref--,归零时从 map 删除
    }
}
使用侧极其简洁:
// read_file.go
unlock := RLockPath(fullPath)
defer unlock()

// write_file.go / edit_file.go
unlock := LockPath(fullPath)
defer unlock()
这个设计的关键属性:
不同路径之间完全无竞争。同时读取 a.go 和 b.go 的两个 goroutine 拿到的是不同的 RWMutex,互不阻塞。只有操作同一路径的并发调用才会发生锁竞争。
引用计数解决了 map 的无限膨胀问题。没有活跃使用者的路径条目会从 pathLocks 中删除,不会因为历史操作路径数量增长而导致内存泄漏。
getOrCreatePathLock 和 releasePathLock 都用 pathLocksMu 互斥保护 map 操作,确保 ref++ 和 ref-- 的原子性。
与全局 sync.RWMutex 相比,路径级锁的优势在吞吐量上:LLM 同时调用 read_file("a.go") 和 write_file("b.go") 时,两个操作可以完全并行。
六、edit_file 的四级模糊匹配
edit_file 是内置工具中设计最复杂的一个,它解决的问题是:LLM 生成的 source_text 和文件里的实际内容经常不完全一样。
四级容错流水线(Four-Level Fallback Pipeline)在 fuzzyReplace 函数中展开:
// L1: 精确匹配
count := strings.Count(originalContent, sourceText)
if count == 1 {
    return strings.Replace(originalContent, sourceText, targetText, 1), nil
}
if count > 1 {
    return "", fmt.Errorf("source_text 匹配到了 %d 处,请提供更多的上下文代码以确保唯一性", count)
}

// 进入 L2-L4,先做换行符归一化
normalizedContent := strings.ReplaceAll(originalContent, "\r\n", "\n")
normalizedSource := strings.ReplaceAll(sourceText, "\r\n", "\n")

// L2: 换行符归一化匹配
count = strings.Count(normalizedContent, normalizedSource)
if count == 1 { /* 替换,按需恢复 \r\n */ }

// L3: 整体首尾去空
trimmedSource := strings.TrimSpace(normalizedSource)
if trimmedSource != "" {
    count = strings.Count(normalizedContent, trimmedSource)
    if count == 1 { /* 替换 */ }
}

// L4: 逐行去缩进滑动窗口匹配
return lineByLineReplace(normalizedContent, normalizedSource, normalizedTarget, hasCRLF)
每一级都有唯一性校验(Uniqueness Guard):count > 1 时直接返回错误,要求 LLM 提供更多上下文,而不是猜测匹配哪一处。这避免了"错改正确代码"这类沉默的破坏性错误。
L4 的逐行去缩进是最后的容错防线,专门应对 LLM 对缩进的不稳定输出。它用滑动窗口逐行比较 strings.TrimSpace 后的内容,容忍空格和 Tab 的差异。
换行风格保留是一个细节:L2 及以下的替换在归一化内容(\n)上完成,写回前检查原始文件是否含 \r\n,如果有就恢复,确保跨平台兼容。
这套机制的工程意义在于:LLM 不需要完美地复现代码格式,框架会帮它找到最接近的匹配。同时,唯一性校验确保这种"宽容"不会变成"危险"。

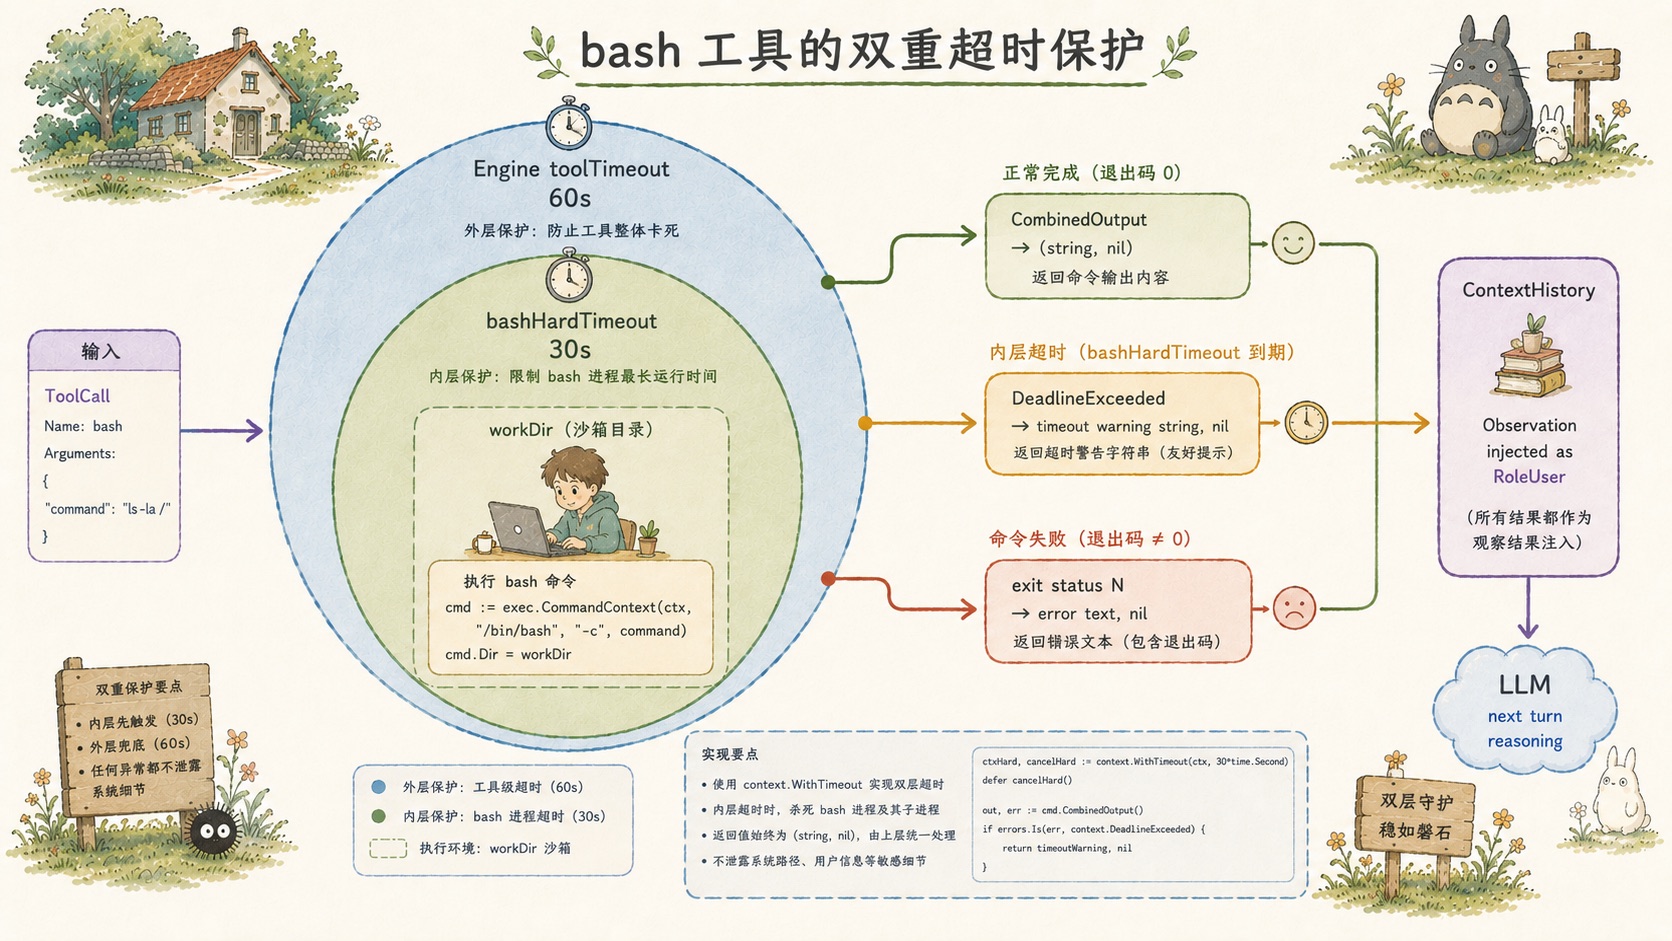
七、bash 工具的 YOLO 哲学与双重超时
bash 工具与其他文件工具在安全哲学上完全不同。它不做路径沙箱,也不做命令白名单。
const bashHardTimeout = 30 * time.Second

func (t *BashTool) Execute(ctx context.Context, args json.RawMessage) (string, error) {
    // ...
    timeoutCtx, cancel := context.WithTimeout(ctx, bashHardTimeout)
    defer cancel()

    cmd := exec.CommandContext(timeoutCtx, "bash", "-c", input.Command)
    cmd.Dir = t.workDir
    out, err := cmd.CombinedOutput()

    if timeoutCtx.Err() == context.DeadlineExceeded {
        return outputStr + "\n[警告: 命令执行超时(30s),已被系统强制终止。]", nil
    }
    if err != nil {
        // 注意:返回 (string, nil),不是 (string, error)
        return fmt.Sprintf("执行报错: %v\n输出:\n%s", err, outputStr), nil
    }
    // ...
}
三个设计点:
bash -c 包裹支持完整 Shell 语法——管道、逻辑与、环境变量、重定向,LLM 不需要拆分命令。
双重超时兜底:引擎层的 toolTimeout(默认 60s)和工具内的 bashHardTimeout(30s),实际生效的是两者中较短的那个。这是针对 tail -f、top、Web 服务等阻塞型命令的"安全网"。
命令失败时返回 (string, nil) 而非 (string, error)——这是 YOLO 哲学的实现细节。返回 nil 意味着 Registry 会生成 IsError=false 的 ToolResult,错误内容(包含 exit code 和 stderr)作为普通文本进入上下文,LLM 阅读后自行决策。不做半吊子沙箱:bash 工具本质上提供完整 shell 访问,加 cd / 就能逃逸 workDir,做命令白名单只是制造安全假象。如果需要路径安全,用 read_file 和 write_file。
八、工具系统的整体鸟瞰
把上面所有层次拼在一起:
LLM Provider
    │ ToolCall[](含 json.RawMessage Arguments)
    ▼
AgentEngine.executeTools
    ├── goroutine[0] → toolCtx(独立超时)→ Registry.Execute → BashTool
    ├── goroutine[1] → toolCtx(独立超时)→ Registry.Execute → ReadFileTool
    │                                             └── safePath → RLockPath → os.Open
    └── goroutine[2] → toolCtx(独立超时)→ Registry.Execute → EditFileTool
                                                  └── safePath → LockPath → fuzzyReplace
    ↓ sync.WaitGroup.Wait()
results[0..n](预分配,无竞态)
    │ IsError=true 时原样回传
    ▼
ContextHistory(RoleUser + ToolCallID 关联)
    │
    ▼
下一轮 LLM 推理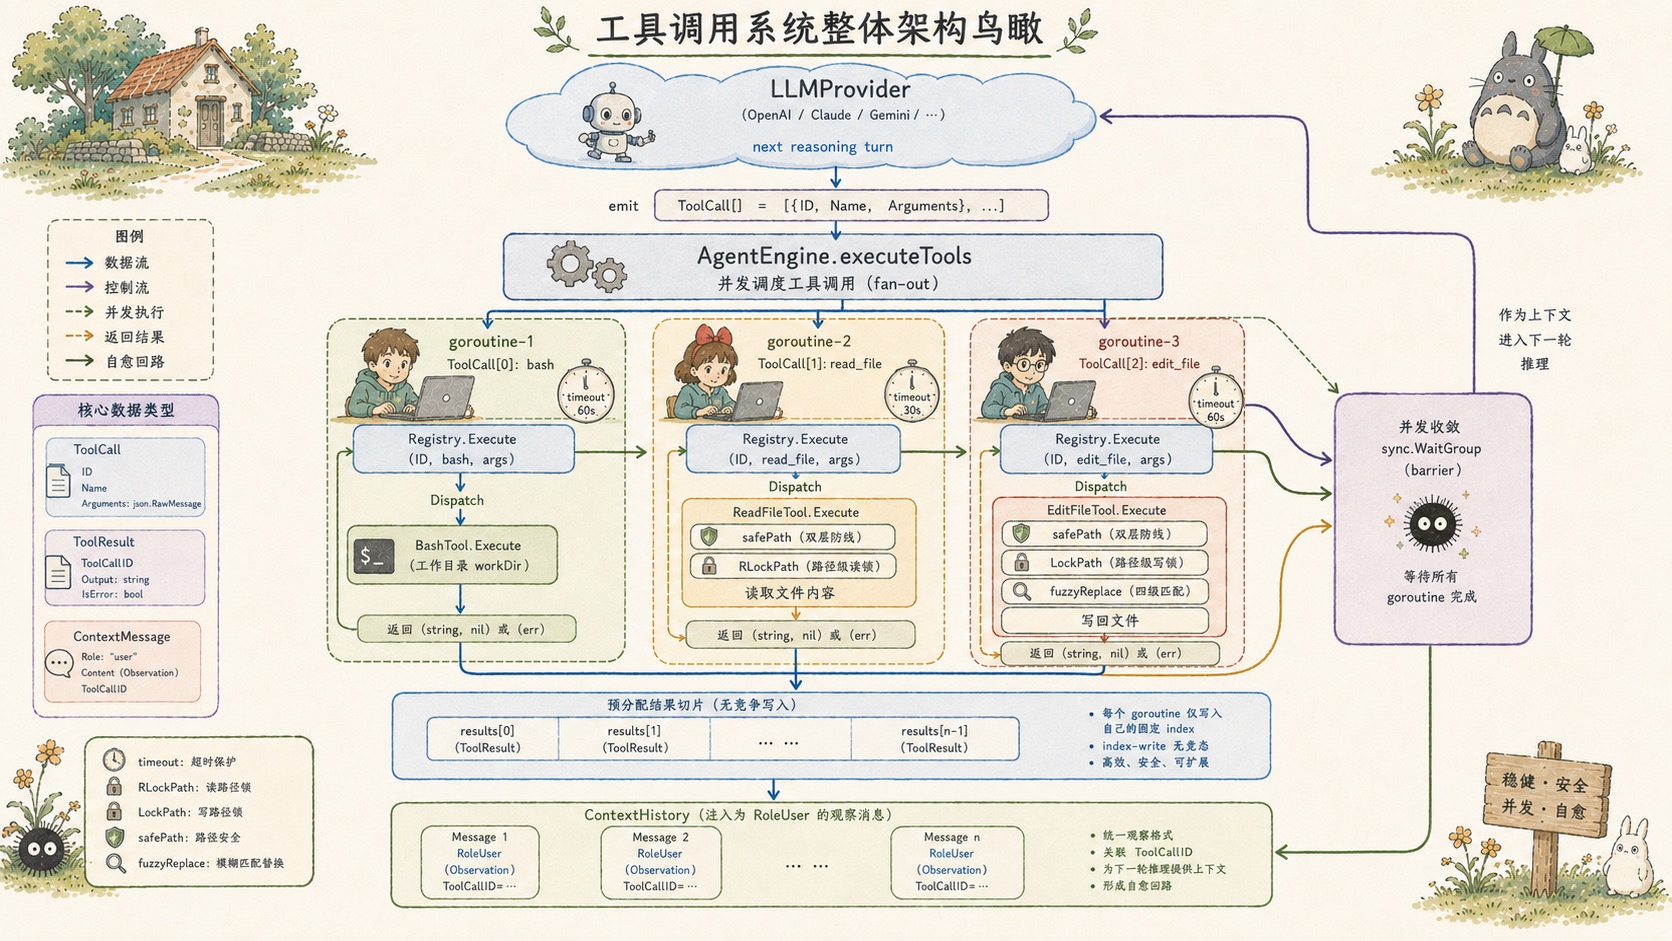
结语
harness9 的工具调用系统是框架"简洁但完备"原则的缩影:3 个核心类型、2 个接口、1 个并发执行函数,加上 safePath 和路径级锁构成的安全底座,edit_file 的四级模糊匹配应对 LLM 输出的不确定性。
值得思考的问题:当工具数量增长到数十个、LLM 每次可能发出 10 个并发调用时,maxConcurrentTools 和 toolTimeout 的最优配置是什么?这个问题的答案,很大程度上取决于具体工具的 I/O 特性和模型的调用习惯。